How to Get WhatsApp Business API AccessWithout a BSP in 2026
May 21, 2026
·
11 min read
In this article: The BSP myth vs reality · What you actually need · 3 prerequisites · 8-step setup guide · The webhook problem nobody explains · Direct vs BSP — when each makes sense · FAQ
The myth every BSP wants you to believe
Search "how to get WhatsApp Business API access" and almost every result funnels you to a BSP sign-up page within three paragraphs. AiSensy, Wati, Respond.io, Trengo — they all frame the BSP as a mandatory step. Some say it explicitly. Most imply it by only ever showing you how to set up their platform, never the underlying API.
This was accurate during the On-Premise API era (2018–2022). Back then, Meta controlled access tightly. Getting a WhatsApp Business number on the API required BSP sponsorship, a formal application, weeks of vetting, and then Docker containers running on your servers. A BSP wasn't optional — they were the only door in.
Meta changed this when they launched the WhatsApp Cloud API at F8 in May 2022. Direct access through the Meta Developer Portal opened to any developer, globally. No application, no sponsorship, no BSP middleman required. The door is open. Most BSPs just haven't updated their content to tell you that.
The myth (pre-2022)
You need a BSP to access the WhatsApp API
True for the On-Premise API (2018–2022). Access required BSP sponsorship, formal application, weeks of approval, and self-hosted Docker infrastructure. BSPs were the only viable route for most businesses.
The reality (2022–today)
You can go direct through Meta Developer Portal
Since the Cloud API launched in May 2022, any developer can register a phone number directly at developers.facebook.com. No BSP required. No application. No waiting period. Access is open to anyone with a Meta Business Account.
What "without a BSP" actually means — and what you still need
Going "without a BSP" means accessing the WhatsApp Cloud API directly through Meta's infrastructure — calling graph.facebook.com yourself, generating your own permanent access token, and registering your own webhook endpoint. You are not going through a third-party platform's dashboard, paying their markup, or being subject to their terms on top of Meta's terms.
What it does not mean: you need zero infrastructure. The Cloud API is a two-way channel. Sending messages is the easy part — you make an HTTP POST to Meta's endpoint. Receiving messages is the part everyone skips. When a customer messages your number, Meta fires an HTTP POST webhook to a registered endpoint. You need something running at that endpoint to catch it.
That "something" is either:
Your own server running a webhook handler that verifies HMAC-SHA256 signatures and processes the payload
A no-code workflow tool like n8n, Make.com, or Zapier that accepts webhooks natively
A dedicated webhook platform like SocialHook that sits between Meta and your server, normalizing payloads and handling verification for you
The distinction matters: BSP-free does not mean infrastructure-free. It means you are not locked inside someone else's platform. You own the API access, the data, and the logic.
3 things you need before you start
👤
A Meta Business Account
Not a personal Facebook account — a verified Meta Business Account at business.facebook.com. You need a real business name and a valid address. This is free and takes about 5 minutes.
Required
📞
A phone number not on WhatsApp
Any number that can receive an SMS or voice call for OTP verification — mobile, landline, or VoIP. It must not currently be registered on any WhatsApp account. If it is, deregister it first.
Must be WhatsApp-free
🔗
A webhook endpoint
A publicly reachable HTTPS URL that will receive inbound message events from Meta. Your own server, a tool like n8n, or SocialHook. You need this URL before completing setup.
Needed for inbound messages
On the phone number: You cannot use a number currently active on the WhatsApp Business App without deregistering it. If your number is already on the Business App, open the app → Settings → Account → Delete my account. This removes it from the app. Then you can register it on the API. The same number — same customer contacts, no customer-visible change.
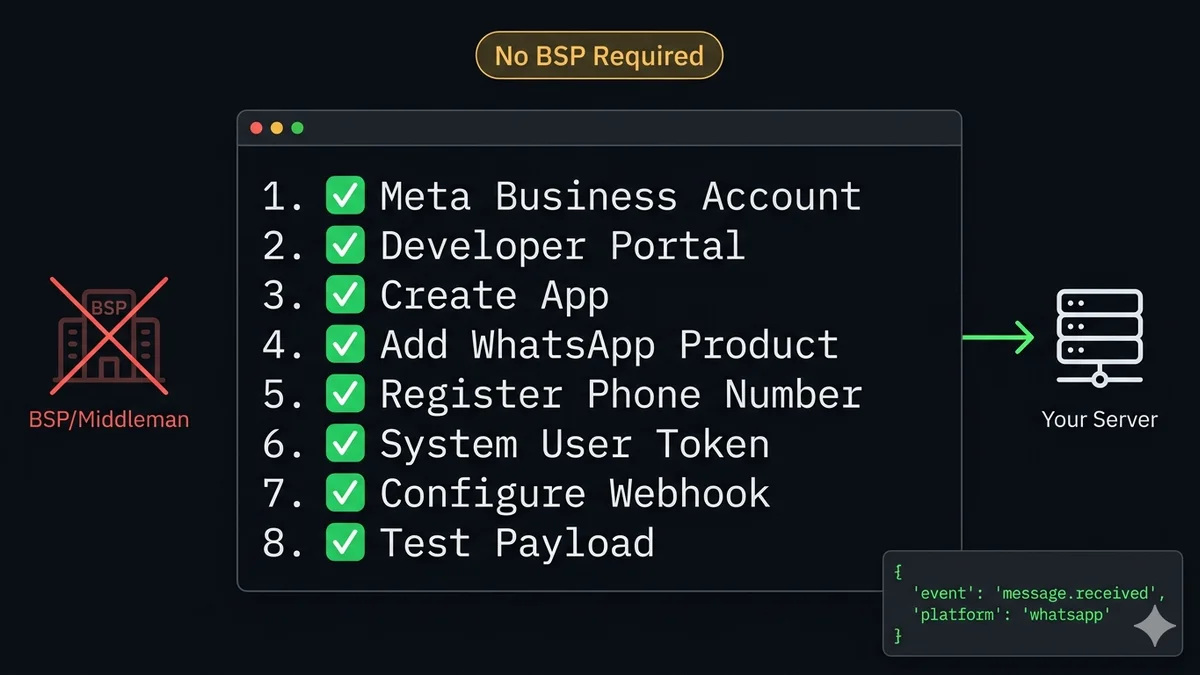
8 steps to direct WhatsApp Cloud API access
This is the exact sequence. No BSP dashboards, no sales calls, no waiting periods. Total time for a developer: under 30 minutes.
01
Create or verify your Meta Business Account
Go to business.facebook.com. If you already have one, confirm it is verified. If not, click Create Account — you need a business name, your name, and a work email. After creation, add your business details (address, phone, website) to improve verification standing. A verified business account gives you higher messaging limits from the start.
business.facebook.com
02
Register as a Meta Developer
Go to developers.facebook.com and log in with your Facebook account. If you have not registered as a developer before, click Get Started and follow the verification steps. No application or approval needed — this is a self-service registration that completes immediately.
developers.facebook.com
03
Create a new App in the Meta Developer Dashboard
In the Developer Dashboard, click Create App. Select Business as the app type when prompted. Give it a name (something that identifies your project — it's not public-facing). When asked to connect a business portfolio, select the Meta Business Account you created in Step 1. This links the app to your business for compliance and messaging permissions.
App type matters: Only Business-type apps can add the WhatsApp product. Consumer or other app types do not have access to the WhatsApp API product.
04
Add the WhatsApp product to your App
Inside your new app's dashboard, scroll to Add Products to Your App and find WhatsApp. Click Set Up. This creates a WhatsApp Business Account (WABA) linked to your app and opens the WhatsApp configuration panel. Meta automatically creates a test phone number you can use immediately — useful for testing your webhook before adding your real number.
05
Add and verify your phone number
Navigate to WhatsApp → Phone Numbers in the left sidebar. Click Add Phone Number. Enter your display name (what customers see), your business category, and the phone number. Choose SMS or voice call for the OTP. Enter the 6-digit code when it arrives. Your number is now registered on the WhatsApp Cloud API.
Display name review: Your WhatsApp display name goes through Meta's review process, which typically completes within 24 hours. The number is functional immediately — you can send and receive test messages before the display name is approved.
06
Generate a permanent System User access token
Go to your Meta Business Account → Settings → Business Settings → System Users. Click Add, create a System User with Admin role. Then click Add Assets and add your WhatsApp Business Account. Click Generate New Token, select your App, and add these two permissions: whatsapp_business_messaging and whatsapp_business_management. Copy the token — this is your permanent access token that never expires.
Why System User, not your personal token? User tokens expire after 60 days and are tied to your personal Facebook account. System User tokens are permanent, not tied to any human account, and survive if you leave the business. Always use System User tokens in production.
07
Configure your webhook endpoint
Navigate to WhatsApp → Configuration in the Developer Dashboard. Under Webhooks, click Edit. Enter your callback URL (your server's HTTPS endpoint) and a verify token — a string you make up that Meta will send back to confirm ownership. Click Verify and Save. Meta sends a GET request to your URL with hub.challenge — your endpoint must return that challenge value. Then subscribe to the messages webhook field.
Using SocialHook instead of your own server? Your callback URL is your SocialHook webhook URL from the dashboard. SocialHook handles the verification challenge automatically — you paste the URL, and Meta confirms it in seconds. See the quickstart guide.
08
Send a test message and verify the full pipeline
In the WhatsApp → Getting Started panel, use the test message interface to send a message to your own WhatsApp number. You should receive it on your phone. When your webhook receives the delivery status event, the pipeline is confirmed end-to-end. Then send yourself an inbound message — your webhook endpoint should fire within milliseconds. If it does, you have direct WhatsApp Cloud API access without a single BSP involved.
The piece every tutorial forgets: the inbound webhook problem
You now have API access. You have an access token. You can send messages to any number. You are done, right?
No. And this is where 90% of "how to get WhatsApp API access" tutorials stop — right before the part that actually matters for building anything useful.
When a customer sends a message to your WhatsApp Business number, Meta's Cloud API fires an HTTP POST to your registered webhook URL. That POST contains a JSON payload with the sender's number, message type, body, timestamp, and conversation ID. If your webhook endpoint is not running 24/7, publicly reachable, and correctly verifying the HMAC-SHA256 signature in the header, those inbound messages either fail to deliver or arrive at your endpoint but get rejected as unverified.
This is exactly what SocialHook's WhatsApp webhook integration solves. Instead of building and maintaining a production-grade webhook handler yourself, SocialHook receives every inbound Cloud API event, verifies the signature, normalizes the payload to a consistent JSON format, and forwards it to your endpoint — whether that's your server, n8n, Make.com, or Zapier. Automatic 3x retry with exponential backoff handles server downtime. Full delivery logs show you exactly what arrived, what status code your endpoint returned, and how long it took.
Here is what arrives at your endpoint after SocialHook processes the inbound Cloud API event:
inbound-whatsapp-via-socialhook.json — <50ms from Meta to your endpoint
{ "platform":"whatsapp", "event":"message.received", "timestamp":1747231892, "from":"+49 30 12345678",// sender's phone number "conversation_id":"conv_8j3k...", "message": { "type":"text",// text | image | audio | document | location | reaction "body":"I just set up without a BSP — works great!", "id":"wamid.HBgL..." }, "signature_verified":true,// HMAC-SHA256 checked by SocialHook "delivery": { "attempt":1,// retried automatically if your server is down "latency_ms":44 } }
One account. Three channels. Same payload format. SocialHook normalizes inbound events from WhatsApp, Facebook Messenger, and Instagram DMs into the same consistent JSON structure. You write your webhook handler once. It handles all three Meta messaging channels without any platform-specific parsing logic. All for a flat $50/month with zero per-message fees on top.
Direct Cloud API access vs a BSP: when each fits
Going direct is not always the right call. Here is an honest comparison of both paths — so you can make the decision based on what you are actually building, not based on a BSP's sales copy.
Consideration
Direct Cloud API (+ SocialHook)
BSP Platform
Setup complexity
Medium — 8 steps, ~30 min for developers
Low — guided UI onboarding
Technical requirement
Basic API / webhook experience needed
No technical skills required
Data ownership
✓ Full — data goes to your server
✗ BSP stores your conversations
Custom automation logic
✓ Unlimited — you write the logic
Limited to BSP's flow builder
AI agent / LLM integration
✓ Native — pipe webhooks to any AI
Requires BSP's built-in AI features
n8n / Make.com / Zapier
✓ Works natively via SocialHook
Partial — varies by BSP
Monthly cost (infra only)
$50/month flat (SocialHook) — no per-msg fee
$50–$800+/month based on contacts / volume
Shared team inbox (UI)
✗ You build it, or it's not needed
✓ Built in
No-code chatbot builder
✗ Not included
✓ Included
Broadcast campaign manager
Via your own code or n8n
✓ Built in
Platform lock-in
✓ None — switch anytime
✗ Data and flows locked in BSP
Best for
Developers, agencies, AI builders, technical teams
Non-technical teams, SMBs needing a UI fast
The direct path wins when you are building something — an AI agent that handles WhatsApp conversations, a CRM integration that syncs every message to your database, a multi-channel automation that treats WhatsApp, Facebook, and Instagram as a unified event stream. It also wins when you manage multiple client WhatsApp numbers and need raw data going to your own infrastructure rather than locked inside a BSP's dashboard.
A BSP wins when your team is non-technical, you need a working shared inbox and chatbot builder without writing a line of code, and you're okay with the BSP's pricing model and data terms. Our SocialHook vs ManyChat comparison breaks down this decision for the most common BSP stack.
The honest answer: Most developers who ask "how do I get WhatsApp API access without a BSP" are not actually trying to avoid all infrastructure — they are trying to avoid being locked inside someone else's product. SocialHook is the answer to that specific problem. You get direct Cloud API access (steps 1–8 above), SocialHook receives and normalizes your webhooks, and everything downstream is yours to build on. No BSP dashboard, no contacts-based pricing, no lock-in. See the quickstart guide or review the security docs to understand how payload signing works.
FAQ
Common questions
Do I need a BSP to access the WhatsApp Business API?
No. Since Meta launched the WhatsApp Cloud API in May 2022, any developer can access it directly through the Meta Developer Portal. You create a Meta Developer account, build a Business-type app, add the WhatsApp product, register your phone number, and generate a permanent System User access token. A BSP is optional — useful if you want a managed dashboard, not required for direct API access.
What is the difference between a BSP and SocialHook?
A BSP (Business Solution Provider) is a managed platform that gives you a full product — chatbot builder, campaign manager, shared team inbox — on top of the WhatsApp API. You work inside their interface. SocialHook is not a BSP. It is a webhook delivery platform: it receives raw Cloud API inbound events, normalizes the payload, verifies the HMAC-SHA256 signature, handles retries, and forwards clean JSON to your server URL. You own all the logic. SocialHook just guarantees the delivery pipeline.
What phone number can I use for the WhatsApp Business API?
Any number that can receive an SMS or voice call — mobile, landline, or VoIP. The number must not be currently registered on any WhatsApp account (personal or Business App). If it is, delete that WhatsApp account first from the app's settings. You can use your existing business number once deregistered from the app — customers see the same number with no change.
How long does setup take without a BSP?
For a developer: under 30 minutes. Meta Business Account (5 min) → Developer registration (2 min) → App creation and WhatsApp product setup (10 min) → Phone number registration and OTP (2 min) → System User token generation (5 min) → Webhook configuration (5 min). That's it. Compare this to the 2–6 weeks the old On-Premise BSP route required.
Do I need a server to receive inbound WhatsApp messages?
Yes — or a webhook platform. When a customer messages your number, Cloud API fires an HTTP POST to your registered webhook URL. Without a reachable endpoint, inbound messages never reach you. You can use your own HTTPS server, a workflow tool like n8n or Make.com (both accept webhooks natively and work with SocialHook), or SocialHook directly as the managed webhook receiver.
What are the messaging limits on a direct Cloud API connection?
New numbers start on Tier 1: 1,000 unique business-initiated conversations per 24 hours. As your number builds a quality rating (customers respond, no blocks, no spam reports), Meta automatically upgrades you to Tier 2 (10K), Tier 3 (100K), and Tier 4 (unlimited). Session messages — replies within a customer-opened 24-hour window — have no daily cap at any tier. Tier progression is identical whether you go direct or via BSP.
What happens to my webhook when I read the article on the previous blog?
If you're referencing our Cloud API vs On-Premise comparison, the webhook structure is the same for direct access. The only difference is you registered the number yourself rather than through a BSP. Your webhook endpoint receives the same Cloud API Graph API format events — SocialHook normalizes these before they reach your server regardless of how you provisioned the number.
You registered the number. You have the token. The last step is a webhook endpoint that actually works — verified, normalized, retried on failure, logged. That's SocialHook. Paste your SocialHook URL into Meta's webhook config and you're done.