How to Receive WhatsApp Messageson Your Server —Complete 2026 Guide
May 21, 2026
·
14 min read
In this guide: How the webhook pipeline works · Build the endpoint (Node.js + Python) · Handle the verification challenge · HMAC-SHA256 signature verification · Parse every message type · Handle media downloads · Production queue pattern · SocialHook as the managed layer · FAQ
How the inbound WhatsApp message pipeline works
Most tutorials start with code before explaining the architecture. That is why most implementations have bugs. Here is the complete pipeline — every hop a message takes before it reaches your application logic:
📱
Customersends message
WhatsApp network
☁️
Meta Cloud APIgraph.facebook.com
HTTP POST + HMAC sig
🔗
Your WebhookHTTPS endpoint
verify → queue → 200 OK
⚙️
Your LogicAI, CRM, DB
Four things must be true for this pipeline to work reliably:
Your endpoint is publicly reachable over HTTPS. No localhost, no HTTP. Meta rejects non-HTTPS URLs and cannot reach private IPs.
Your endpoint responds 200 within 20 seconds. Anything slower and Meta retries the delivery. If it retries enough times, it stops sending to your endpoint entirely.
You verify the HMAC-SHA256 signature on every request. Without this, any attacker who discovers your webhook URL can send fake messages to your system.
You acknowledge first, process second. Return 200 immediately, push the payload to a queue, process async. Never do heavy work synchronously in the webhook handler.
Step 1: Build the webhook endpoint
Your endpoint needs to handle two HTTP methods on the same URL: GET (Meta's one-time verification challenge) and POST (live message events). Here is the minimal working implementation in both Node.js and Python.
Node.js + Express
webhook.js
const express = require('express');
const crypto = require('crypto');
const app = express();
// CRITICAL: parse raw body BEFORE express.json()// You need the raw buffer for HMAC verification
app.use('/webhook', express.raw({ type: '*/*' }));
constVERIFY_TOKEN = process.env.WEBHOOK_VERIFY_TOKEN; // your own stringconstAPP_SECRET = process.env.WHATSAPP_APP_SECRET; // from Meta Developer Dashboard// GET — Meta verification challenge
app.get('/webhook', (req, res) => {
const mode = req.query['hub.mode'];
const token = req.query['hub.verify_token'];
const challenge = req.query['hub.challenge'];
if (mode === 'subscribe' && token === VERIFY_TOKEN) {
console.log('Webhook verified ✓');
res.status(200).send(challenge); // return challenge as plain text
} else {
res.sendStatus(403);
}
});
// POST — inbound message events
app.post('/webhook', (req, res) => {
// 1. Verify signature BEFORE anything elseif (!verifySignature(req)) {
return res.sendStatus(403);
}
// 2. Acknowledge immediately — NEVER process synchronously
res.sendStatus(200);
// 3. Parse and enqueue for async processingconst body = JSON.parse(req.body.toString());
enqueue(body); // your queue function — see Step 6
});
app.listen(3000, () => console.log('Webhook server running :3000'));
Step 2: Handle the verification challenge correctly
When you register your webhook URL in the Meta Developer Dashboard, Meta sends a one-time GET request to verify you control the endpoint. This is the step that trips up almost every first implementation — usually because developers return JSON instead of plain text, or return the full params object instead of just the challenge value.
The GET request from Meta includes three query parameters:
hub.mode — always the string subscribe
hub.verify_token — the string you set in the Meta Dashboard. You choose this value — make it a random secret, not a predictable word
hub.challenge — a random number Meta wants back as plain text
Your endpoint must: (1) check that hub.mode === 'subscribe', (2) check that hub.verify_token matches your expected value, (3) return hub.challenge as the response body with Content-Type: text/plain and a 200 status. Return JSON, return the wrong value, or return a non-200 status — the verification fails and Meta marks your webhook as unverified.
Common mistake: Using res.json({ challenge }) in Express instead of res.send(challenge). Meta expects plain text. JSON-wrapping the challenge causes verification to fail even though your server returns 200.
Step 3: HMAC-SHA256 signature verification — the step nobody skips in production
Your webhook URL is public. Anyone who finds it can POST fake payloads to your server. Without signature verification, your AI agent could be fed fabricated conversations, your CRM could be poisoned with invented contacts, and your logic could be triggered by an attacker at will.
Meta signs every POST request using your App Secret (found in Meta Developer Dashboard → App Settings → Basic). The signature is in the X-Hub-Signature-256 header, formatted as sha256=<hex_digest>. The digest is HMAC-SHA256 of the raw request body bytes using your App Secret as the key.
Node.js
verifySignature.js
functionverifySignature(req) {
const sigHeader = req.headers['x-hub-signature-256'];
if (!sigHeader) return false;
// Remove 'sha256=' prefixconst receivedSig = sigHeader.slice(7); // everything after 'sha256='// req.body MUST be the raw buffer — see express.raw() setup aboveconst expectedSig = crypto
.createHmac('sha256', APP_SECRET)
.update(req.body) // raw Buffer, NOT parsed JSON
.digest('hex');
// timingSafeEqual prevents timing attackstry {
return crypto.timingSafeEqual(
Buffer.from(receivedSig, 'hex'),
Buffer.from(expectedSig, 'hex')
);
} catch {
return false; // mismatched lengths throw — treat as invalid
}
}
module.exports = { verifySignature };
Critical: use raw bytes, not parsed JSON. If you call JSON.parse() before computing the HMAC, the digest will never match — JSON serialization can alter whitespace and key ordering. You must compute the HMAC on the exact bytes that arrived in the request body. In Express, this means setting up express.raw() on your webhook route before any other body parser. In FastAPI, call await request.body() before any JSON deserialization.
Step 4: Local development — expose localhost to Meta
Meta cannot reach http://localhost:3000. During development, you need a public HTTPS URL that tunnels traffic to your local server. Two reliable options:
Terminal
tunnel options
# Option A: ngrok (most common, requires free account)
ngrok http 3000
# → https://a1b2c3d4.ngrok-free.app ← paste this into Meta Dashboard# Option B: Cloudflare Tunnel (free, no time limit, requires cloudflared)
cloudflared tunnel --url http://localhost:3000
# → https://random-words.trycloudflare.com ← paste this# Your full webhook URL to register in Meta Dashboard:# https://your-tunnel-url.ngrok-free.app/webhook
Register the tunnel URL in the Meta Developer Dashboard (WhatsApp → Configuration → Webhooks). When you restart ngrok it generates a new URL — update the dashboard each time. Cloudflare Tunnel persists across restarts on named tunnels. Switch to your production domain URL before going live.
Step 5: Register the webhook in Meta Developer Dashboard
With your endpoint running and publicly accessible:
Open developers.facebook.com → your App → WhatsApp → Configuration
Under Webhooks, click Edit
Paste your HTTPS webhook URL (e.g. https://yourdomain.com/webhook)
Enter your Verify Token — the exact string you set in VERIFY_TOKEN
Click Verify and Save — Meta fires the GET challenge immediately. Your server must respond within ~5 seconds.
After saving, click Manage next to the webhook and enable the messages field subscription. Without this, Meta won't push inbound message events to your endpoint.
Step 6: Parse the Cloud API webhook payload
Once verification is complete, every inbound customer message triggers a POST to your endpoint. Here is the full structure of a Cloud API text message event — and how to navigate it:
The message you care about is buried at body.entry[0].changes[0].value.messages[0]. This nesting catches everyone off guard. A status update event (delivery receipt) arrives in the same envelope but has a statuses array instead of messages. Here is the extraction pattern:
Node.js
parseWebhook.js
functionparseWebhookEvent(body) {
const value = body?.entry?.[0]?.changes?.[0]?.value;
if (!value) return null;
const phoneNumberId = value.metadata?.phone_number_id;
// Inbound messagesif (value.messages?.length) {
const msg = value.messages[0];
return {
kind: 'message',
phoneNumberId, // which of your numbers received it
from: msg.from, // sender — no + prefix
messageId: msg.id,
timestamp: parseInt(msg.timestamp, 10), // convert string→int
type: msg.type, // 'text'|'image'|'audio'|etc
raw: msg, // full message object
};
}
// Delivery/read status updatesif (value.statuses?.length) {
const s = value.statuses[0];
return {
kind: 'status',
messageId: s.id,
status: s.status, // 'sent'|'delivered'|'read'|'failed'
recipient: s.recipient_id,
};
}
return null;
}
Step 7: Handle all WhatsApp message types
The type field tells you which property to read. Every type has a different structure. Here is the complete map:
💬
text
Standard text message from the customer
Read: msg.text.body
🖼️
image
Photo sent by customer. May include optional caption.
Read: msg.image.id → download
🎵
audio
Voice note or audio file. voice: true if recorded in-app.
Read: msg.audio.id → download
📄
document
PDF, Word, Excel, or other file. Includes filename.
Read: msg.document.id, .filename
🎬
video
Video file. May include caption.
Read: msg.video.id → download
📍
location
Pin dropped by customer. Includes lat/lng and optional name.
Read: msg.location.latitude, .longitude
👤
contacts
vCard contact(s) shared by customer.
Read: msg.contacts[0].name
😀
reaction
Emoji reaction to one of your messages.
Read: msg.reaction.emoji, .message_id
🔘
interactive
Button tap or list selection from a WhatsApp Flow message.
Step 8: Download incoming media — the two-step fetch
When a customer sends an image, voice note, or document, the webhook payload does not contain the file — it contains a media ID. You must make a separate API call to resolve the ID to a temporary download URL, then fetch the actual file. The download URL expires after 5 minutes — download immediately and store on your own infrastructure.
Node.js
downloadMedia.js
constGRAPH_URL = 'https://graph.facebook.com/v21.0';
constACCESS_TOKEN = process.env.WHATSAPP_ACCESS_TOKEN;
// Step 1: resolve media ID → temporary download URLasync functiongetMediaUrl(mediaId) {
const res = awaitfetch(
`${GRAPH_URL}/${mediaId}`,
{ headers: { Authorization: `Bearer ${ACCESS_TOKEN}` } }
);
const data = await res.json();
return data.url; // expires in 5 minutes — download NOW
}
// Step 2: fetch the actual file bytesasync functiondownloadMedia(mediaUrl) {
const res = awaitfetch(mediaUrl, {
headers: { Authorization: `Bearer ${ACCESS_TOKEN}` }
});
return Buffer.from(await res.arrayBuffer());
}
// Compose: resolve ID → download → store on S3/GCS/your serverasync functiondownloadAndStore(mediaId, filename) {
const mediaUrl = awaitgetMediaUrl(mediaId);
const buffer = awaitdownloadMedia(mediaUrl);
awaituploadToStorage(buffer, filename ?? mediaId);
// store the mediaId or your storage URL in your DB for the conversation record
}
Step 9: Queue architecture — never process in the webhook handler
This is the production pattern that separates a toy implementation from one that survives real traffic. The rule is absolute: your webhook handler must return 200 within 20 seconds. If you call an LLM, query a CRM, or download media synchronously inside the handler, you will eventually time out under load, Meta will retry, and you will process duplicate events.
The correct pattern: acknowledge immediately, push the raw payload to a queue, process asynchronously in a worker. Here is a minimal BullMQ pattern (Redis-backed):
Node.js + BullMQ
queue.js
const { Queue, Worker } = require('bullmq');
const redis = { host: '127.0.0.1', port: 6379 };
const whatsappQueue = newQueue('whatsapp', { connection: redis });
// called inside your POST handler — immediate, lightweightasync functionenqueue(payload) {
await whatsappQueue.add('process-event', payload, {
attempts: 3, // retry up to 3 times on worker failure
backoff: { type: 'exponential', delay: 2000 },
removeOnComplete: 100, // keep last 100 completed jobs for debugging
removeOnFail: 200,
});
}
// Worker runs in a separate processconst worker = newWorker('whatsapp', async (job) => {
const event = parseWebhookEvent(job.data);
if (!event) return;
if (event.kind === 'message') {
awaithandleMessage(event.raw); // your AI / CRM logic here
}
if (event.kind === 'status') {
awaitupdateMessageStatus(event.messageId, event.status);
}
}, { connection: redis, concurrency: 10 });
Deduplication: Meta may deliver the same event more than once if your server is slow to acknowledge. Store processed msg.id values in Redis with a short TTL (e.g. 24h). Before processing a job, check if msg.id is already in your deduplication set. If it is, skip. If not, add it and process. This prevents double-responses from your AI agent and duplicate CRM records.
Alternative: skip all of the above with SocialHook
Everything above — verification challenge handling, HMAC-SHA256 signing, payload extraction from nested entry[0].changes[0].value, media ID resolution, retry logic, deduplication — is infrastructure work. It is not your product. It is the scaffolding that your product runs on.
SocialHook replaces this entire layer. You connect your WhatsApp Business number to SocialHook, paste your server's webhook URL in the SocialHook dashboard, and SocialHook:
No nested traversal. No parseInt(timestamp). No missing + prefix on the sender number. No platform-specific switch statements — the same payload shape arrives whether the customer messaged you on WhatsApp, Facebook, or Instagram. One webhook handler, three channels. The full cost is a flat $50/month — less than an hour of engineering time to build and maintain the equivalent from scratch.
FAQ
Common questions
How do I receive WhatsApp messages on my server?
You need a WhatsApp Business number on the Cloud API, a publicly reachable HTTPS endpoint, and that endpoint registered as your webhook in the Meta Developer Dashboard. Meta then fires an HTTP POST to your endpoint on every inbound message. Your server must respond with 200 within 20 seconds. See the complete 9-step setup above.
Why does my HMAC verification keep failing?
Almost always because you're computing the HMAC on the parsed JSON instead of the raw request body bytes. In Express, you must set up express.raw() on your webhook route before any other body parser. In FastAPI, call await request.body() before deserialization. Also check that you're using your App Secret (from App Settings → Basic) and not your access token as the HMAC key — these are different values.
How do I test my webhook locally before deploying?
Use a tunneling tool. ngrok (ngrok http 3000) is the most common — it generates a public HTTPS URL that forwards to your local port. Cloudflare Tunnel (cloudflared tunnel --url http://localhost:3000) is a free alternative with no session time limits. Paste the generated URL into the Meta Developer Dashboard webhook field. Remember to update it when you restart ngrok since the URL changes.
Meta keeps retrying my webhook — why?
Three causes: (1) your server returned a non-200 status — verify signature errors return 403, processing exceptions return 500. (2) your server took longer than 20 seconds to respond — move processing to an async queue and return 200 immediately. (3) your endpoint was down when Meta sent the event — make sure your server is always running or use SocialHook's managed delivery with automatic retry.
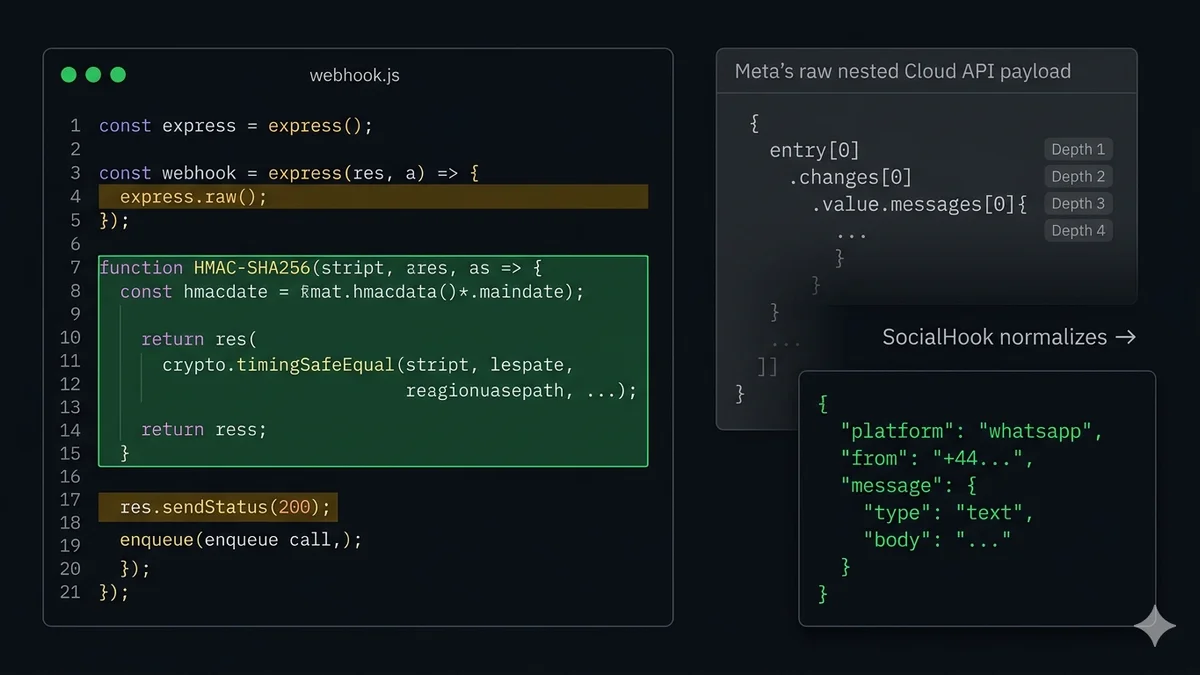
What is the difference between the raw Meta payload and SocialHook's normalized payload?
Meta's Cloud API wraps every event in a nested structure: body.entry[0].changes[0].value.messages[0]. The timestamp is a string, the sender has no + prefix, and the format differs from Facebook Messenger and Instagram webhooks. SocialHook extracts the message, normalizes the sender to E.164 format, converts the timestamp to an integer, and delivers the same flat JSON structure across all three Meta channels. You write one parser and it works for WhatsApp, Facebook, and Instagram.
How do I handle incoming media (images, voice notes, documents)?
The webhook payload contains a media ID, not the file itself. You must: (1) call GET https://graph.facebook.com/v21.0/{media_id} with your access token to get a temporary download URL, (2) fetch the file from that URL (also with your access token in the Authorization header), (3) store the file on your own server or cloud storage. The temporary URL expires in approximately 5 minutes — download immediately. See the full Node.js code in the Media section above.
You've read the full implementation. If you'd rather not maintain HMAC verification, retry logic, and payload normalization yourself — SocialHook handles all of it. Paste your endpoint URL. Receive clean JSON. $50/month flat.